
Behold:

And looking inside it looks like a bunch of bike parts.. in a box!

Since I don't have a bicycle work rack, and since the garage is hot, where is the next best place to build a bicycle? Of course: The front room, with a host of ugly chairs as an audience.

You will notice, I have removed top-cap and cardboard spacer from the headset to install the stem. Also - the shifters and rear brake lever are in a little bag dangling next to the fork. The handlebar is on the left in a little bag. The poploc, grips, front rotor, pedals, reflectors, and screws and such are in the box there. I don't have any pictures, but I installed the stem and handlebar. Then, i slid the shifters, poploc, and bake levers onto the handlebar - all very loosely.The rear and front tires have protective plastic shields over the hub area shown below:

Also notice.. The Elixer CR brakes. *swoon*. If you dont know, these brakes what you would refer to as 'fancy'. The front wheel did not come with the rotor installed. It came with the rotor and 6 little torx bolts that have already got the blue loctite installed. I used a t-25 screwdriver to screw these on. (if I remember correctly)
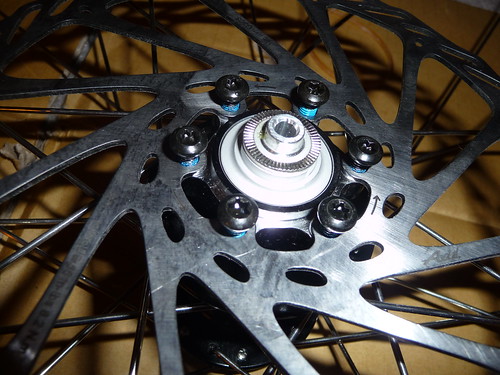
I tightened these using a 'star-method' of doing one then doing the one across from it using guesstimation. They recommend a torque wrench, which I do not have. Next I slid the skewer in. These skewers feel a little flimsy, and i had to take the springs out and untangle them from each other before i could install it. Its funny how springs, when put within an inch of each other, tend to get amazingly tangled. Next, I put the tire on the fork - and then installed the front brake caliper onto the fork. The screws, washers, and spacer-thingy are all put together for you, but not in a way that didn't prevent the whole mess from falling apart when i took it out of the bag. So - I had to fiddle with it and put it back into the right order for about 10 minutes before I could install it.

The only thing left was to install the seat/seatpost, snug up the cockpit, and install the poploc. I dont have any pictures of this process.. However, when installing the poploc - be sure to have the lever OPEN. On the fork - unscrew the tiny little allen screw, then wrap the wire in and under the screw. Hold the wire as well as you can under the screw, and tighten it down. Once this is done, you should cut the wire and stick a crimper on the end so it doesn't fray. I still need to pick up a bottle of crimpy-doos so that I can cut that cable. Also - for the grips, cover the ends of the handlebars with some dish soap to get it a bit slippery. This will make putting the grips on a snap. Otherwise, you will struggle forever. Here is the cockpit once i got it all installed:

Here is the whole bike, after I threw on the crappy pedals that came with the bike:

Check out this hilarity:

Notice something funny? I didnt either right away. MOTOBCEANE. Look again. That sort of spoils the brand new bike smell a little. What kind of idiot misspells their own brand name on their product? Thats really the only thing I am dissatisfied about. The bike, otherwise, looks great. The front wheel needs minor truing and I need to adjust the rear brake, as it is rubbing a little. I had to adjust the derailers a little while test riding, and the thing shifts really nicely. The fork works great, feels really plush or really firm depending on poploc. Of course, this is just a "rode around the neighborhood 20 minutes after setup" analysis. I get my time ATAC pedals on friday. I'll post an in-depth "review" of the bike saturday or sunday.
No comments:
Post a Comment